Initial Inspection (autarkic)
The methods PPAP, PPF and EMP are binding prescriptions for the supplier that have to be proved in regard to the material, form and function towards the customer before starting series-production. The most extensive one is the initial inspection report that includes checking and documentation of all dimensional specifications.
AHP developed a completely new method for the necessary flow of information between customer and supplier. The main target is to support the supplier from the receiving of the measurement problem to the recordation of the result of the measurement.
 For doing measurement tasks at his own location the supplier receives the measurement program iQ-EMP/AUTARKIC from the customer. The customer can now for example send a measurement task as a data file via e-mail or place it in a portal for download.
The workflow is as follows:
The customer creates the measurement task using the AHP software iQ-EMP and sends it as an attachment via e-mail to the supplier. The supplier runs the iQ-EMP/AUTARKIC software and imports the file.
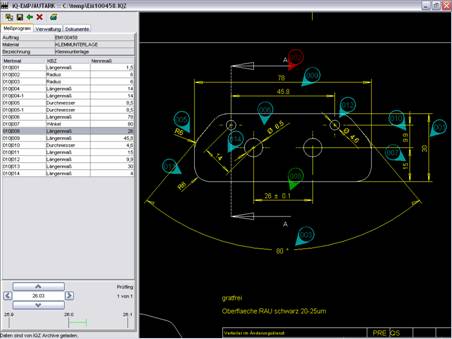
The user interface for the recordation of the measured values consists of just one form (see picture). The inspection order and details about the workpiece are displayed on the left side. The drawing is on the right side.
Which attribute is to be inspected next can be selected in the attribute list using the arrow keys. In the drawing the selected attribute will be emphasized in terms of color. It is also possible to choose the next attribute by clicking it in the drawing. However, the easiest way is to leave choosing the next attribute to the program.
The measured value is entered in the left bottom field. The green bar below the field shows the utilization of the range of tolerance. Using the arrow buttons it is possible to traverse the list of attributes (vertically) or to move from one test item within an attribute to the next or previous one (horizontally).
All actions are mapped to the drawing. When the measurement task is finished the supplier sends the completed file via e-mail back to the customer.
The measured values are read into the prepared initial inspection order at the customer.
The customer can now carry out an inspection of the test items in the same inspection order. This completes the initial inspection so that an EMP decision can be made.