Inspection During Production
Inspections need to be performed during production and during assembly. These inspections are tightly coupled to the work flow and work procedures. Another factor is the quantity to be produced since any software must support single part as well as serial production. The iQ-FEP module provides support for the complete range of required inspections including sampling inspections, single part inspections, inspections during assembly, inspections of charges, 100% inspections, product audits and final part inspections.
Workflow
As any other modules related to inspections iQ-FEP is based on an inspection plan previously created in the iQ-PLAN module. The inspection plan can be created manually or generated from CAD drawings (see iQ-CAD-Interface). It is possible to specify the sampling size (100%, static or dynamic) for the single characteristics (variable or attributive) under consideration of drawings, measuring and test equipment and inspection locations. A specialty of iQ-FEP is its tight connection to the work plan allowing the definition of a specific pre-machining measure for any characteristic and work procedure. The inspection itself is prepared by generating an inspection order from the plan either manually or triggered from the ERP system.
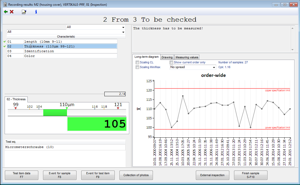
The inspector can use different views for an optimal support in using the inspection environment for the upcoming inspections. By supporting different measuring devices or machines iQ-FEP provides the highest efficiency. Using the Watchdog, problems during production can be reported to email recipients or to the Quality Control Station (iQ-QLEIT). Usage decisions can be made, and it is possible to generate evaluations (including original data chart, x bar, histograms etc.).
Important Features at a Glance
Inspection planning
Inspection planning (see iQ-PLAN) is the process of defining the parameters for the inspections. In inspections during production it is typically used for:
- Generation of inspection plans from CAD drawings for example only with stamps for functional dimensions
- SPC parameters with statistical control limits for variable and attributive characteristics
- Sampling specifications for any procedure (including the option of a 100% inspection)
- Precontrol procedures for small series
- Conjunction of characteristics
- Variant inspection plans for variant inspections with differing characteristics
- Conjunction of work plans for defining pre-machining measurements of a characteristic (e. g. sawing, turning, grinding) with own measuring and test equipment and sampling specifications
- Assigning images/drawings to each characteristic
- Optionally enforce documentation duties in case of defects/events
- Multiple inspection procedures - analogously to work procedures
Order generation
Generation a production order can be initiated manually or be triggered from the ERP system (see iT-INTERFACE). Depending on the use case the following parameters require consideration:
- An inspection order can be created per production order or as a permanent inspection order for the same material. Depending on this it is necessary to specify a production and/or inspection order ID.
- Material ID and planned produced quantity
- Producing cost centre
- Machine and tool
- Lot, charge and so on
- Priorities and comments
Inspection
 The general features of any modules related to inspections are covered in the module description of iQ-PAUF. However, there are some specialties for inspections during production:
- Any number of samples that can be decreased or increased in size - even a sample size of n=1 is possible (e. g. for laboratory tests or single part inspections)
- Unplanned characteristics for exceptional inspections or to be used in global inspection plans
- Inspections based on drawings or pictures including the option to have multiple pictures to define boundary parts
- Input of production information
- Packaging information
- Sampling information (time, inspector, charge from/to, quantity)
- Results
- Test part information (serial number, machine, tool, nest)
- Event, changed measuring values
- Used measuring and test equipment
(Automatic) input of measuring data
Measuring data can be received from standard or complex measuring devices (such as multiple measuring equipment), from a measuring box (Steinwald, IBR or BOBE), or via a serial interface (RS232). Other measuring data can be imported using the import filter. Very huge numbers of measuring values, for example from third-party systems, could also be received in the background (optionally using a discriminator) by the additional module iQ-MESSDAT.
Cumulative reject charts
Cumulative reject charts can be imported into the system either automatically or by scanning a printout (see iQ-BELEG). If there are defects they could be specified per characteristic by selecting from defect groups (mode, location and cause) that have been defined when creating the inspection plan.
Monitoring
During recording of data it is possible to monitor upper and lower limit violations of original value, s, cpk, p etc. using the Watchdog and send them by mail or pass them to the Quality Control Station (see iQ-QLEIT). Defects can be assigned to quality projects using the Quality Control Station where it is also possible to initiate corrective actions.
Usage decisions
(Partly) usage decisions can be made during production monitoring. If a usage decision is to be made or not is specified on the material level. The decision consists of:
- Extent (sample, number of parts etc.)
- Production period (from/to)
- Charge (from/to), serial number (from/to)
- Packaging information
- Machine, tool, nest
- Complaint quantity and reason
- Disposition quantity and reason
The history of the production quality for material disposition and inspection results (see iQ-FERTBEW) is based on the usage decisions.
Evaluations/reports
- Reporting templates are available for inspection reports and measuring protocols, charts for inspected and uninspected parts, material blocking, scrap and inspection lists, inspection preview etc.
- The overview of inspection orders provides an easy access to various short time analyses including diagrams, tables and values such as average, standard deviation and p value.
- Graphical evaluations such as histograms, original value charts, average values, p chart, x bar s or x bar r charts etc. can be run over multiple orders and materials.
- Overview of samples and original values (attributive and variable)
- The iQ-INFO tool can be used to create advanced evaluations based on parameters.
Capability analyses cmk
To perform machine capability examinations it is possible to record and evaluate separate measuring data. The calculation of cm and cmk is only done in case of a normal distribution. If the values are not distributed normally the calculation is passed to qs-STAT.
qs-STAT interface
Advanced evaluations are supported by providing an interface to qs-STAT. The data selection is performed in iQ-BASIS is then directly passed to qs-STAT for further processing.
Interfaces to Other Modules
- iQ-PLAN inspection parameters
- iQ-CAD-Interface Interface for an automatic generation of an inspection plan from a CAD drawing
- iQ-BELEG for digitally recording voucher data such as cumulative reject charts on paper
- iQ-QLEIT Quality Control Station for monitoring the violation of measuring values
- iQ-MESSDAT for automatically importing measuring data from third party systems
- iQ-PLA product lifecycle file for recording product and process data
- iT-INTERFACE - e. g. for connecting to SAP for production orders
- iQ-INFO to create individual evaluations
- iQ-QMS for creating internal messages from the inspections during production
